Kako povezati stropne zvočnike z ojačevalnikom
Stropni zvočniki so odličen način, da svojo sobo napolnite s prostorsko glasbo, ne da bi vas skrbelo, da bi preobremenili vaš prostor. Poleg tega dodajanje ojačevalnika naredi izkušnjo še bolj vznemirljivo s to dodatno močjo. V tem članku bomo razpravljali o tem, kako povezati stropne zvočnike z ojačevalnikom.
Kako se stropni zvočniki povežejo z ojačevalnikom?
Stropni zvočniki so tradicionalno zasnovani za delo z ojačevalci, ki zavzamejo le levi ali desni kanal. Zato je pogosteje kupiti par stropnih zvočnikov in jih priključiti na ojačevalnik kot stereo par.
Vendar ožičenje para stropnih zvočnikov morda ne bo praktično v vseh primerih, zlasti če morate stropni zvočnik namestiti v majhno sobo. V takih primerih so torej najbolj idealni enojni stereo zvočniki. Za povezavo enega samega stropnega stereo zvočnika z ojačevalnikom boste potrebovali dva kabla.
Kateri kabel za zvočnike naj uporabim s svojimi stropnimi zvočniki?
Pri povezovanju zvočnikov z ojačevalnikom je ključnega pomena izbira pravega kabla za zvočnike. To je zato, ker različne žice delujejo različno zaradi različnih ravni impedance.
Dvožilni kabli za zvočnike 16-gauge se običajno uporabljajo kot industrijske standardne instalacije zvočnikov. To pa je bolj učinkovito, če je potrebna dolžina kabla približno 35 metrov. Bistveno je, da razmislite o kablu boljše kakovosti za daljše vožnje, saj se zvočni signal hitro poslabša, če kabel potuje predaleč.
Ali stropni zvočniki potrebujejo ojačevalnik?
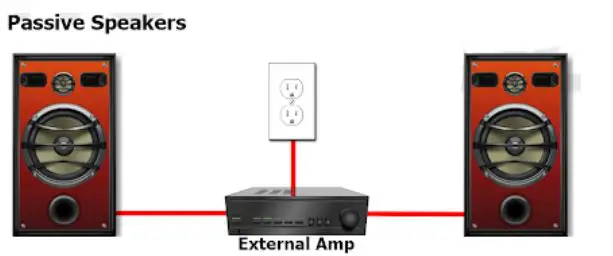
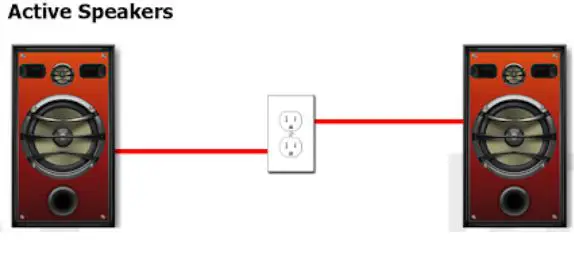
Stropni zvočniki so običajno pasivni (izvedite več o pasivnih proti aktivnim zvočnikom). To pomeni, da bodo potrebovali povezavo z ojačevalnikom. Po drugi strani pa aktivni stropni zvočniki ne potrebujejo ojačevalnika, ker je ta že vgrajen.
Vendar pa predpostavimo, da nameravate večkanalni sistem prostorskega zvoka usmeriti na razpoložljive stropne zvočnike.
V tem primeru boste potrebovali ojačevalnik za veliko boljši izhod zvoka.
Če želite izvedeti več, si oglejte naš članek o tem, ali potrebujete ojačevalnik za stropne zvočnike.
Vendar pa boste morali pred vzpostavitvijo povezave upoštevati nekaj dejavnikov. Tukaj so trije ključni dejavniki:
1. Položaj zvočnikov
Ožičenje stropnih zvočnikov bo veliko lažje, če so nameščeni v dnevni sobi. Tudi razdalja od stropnih zvočnikov do položaja ojačevalnika bo določena s položajem, kjer so bili zvočniki nameščeni v stropu.
2. Mono ali enojni stereo stropni zvočniki?
Stropni zvočniki so tradicionalno zasnovani za delo s stereo sprejemniki. Vendar, če imate omejen prostor in ne morete povezati para zvočnikov, boste uporabili mono ojačevalnike.
3. Ocene zvočnikov
Drugi dejavnik, ki ga je treba upoštevati, so ocene zvočnikov. Ti vključujejo nazivne impedance in moči. Impedanca zvočnika je zelo pomembna za pravilno ujemanje z ojačevalnikom.
Kako povezati stropne zvočnike z ojačevalnikom po korakih
1. korak:Sestavite materiale
Priključitev stropnih zvočnikov na ojačevalnik je lahko brez težav. Da bi dosegli to povezavo, pa morate sestaviti pravo orodje. Tukaj je seznam tega, kar potrebujete:
- Ojačevalnik
- Fish tape or coat lakota
- Ploščati nastavek
- Rokavice
- Raven
- Keyhole or drywall saw
- Philips screwdriver
- Wire strippers
You can have your ceiling speakers wired to an amplifier by sound professionals. However, you can still have the connection through the DIY procedure. If you intend a DIY, take preventive measures such as turning off all mains powers and wearing protective gear for the hands, eye, and legs. 
Before routing the amplifier, you should plan the location to ensure it is well placed, stable, and secure. The location of the amplifier should be strategic for ease of control. Also, if you have a modern amplifier with remote control features such as Wi-Fi, Bluetooth, or Alexa, stationing the amplifier in proximity for ease of navigation by remote or voice is very important.
You should also measure the distance to the amp to establish the length of wire needed to connect the amp to the ceiling speakers. Remember, two runs of speaker wires will be required for stereo installation.
Step 2:Run The Wires
Once the distance and length of speaker wires are established, you can run the UL2 wire from the location of the amplifier to the area of the ceiling speakers.
Running the wires to the ceiling is much easier in new constructions. However, if you are dealing with an old building, you may need to drill holes through support beams to pass the wire to your preferred locations.
Once the wire is connected, leave behind an extra coil of wire at the point where the speakers are located.
Step 3:Prepare The Ceiling Speaker For Connection
Begin by cutting the drywall behind the point where you intend to connect the amp. Pull out the ceiling speakers from their brackets.
Locate the color-coded terminals and connect the red and black wires. Ensure that the colors on the cables are appropriately matched with the speaker terminals. Also, it would help if you secured the connections to avoid the wires coming out during the speaker operation.
Once the connection is secure, return the speakers safely and securely and seal the brackets back again. Ensure that the cables are firmly fixed. Once this is successful, seal the drywall and fill it in place.
Step 4:Run The Wires To The Amplifier
Once the red and black speaker wires are connected to the ceiling speakers, run them through the wall into the terminals of the amplifier. Considering the distance between the devices, you can choose to run the wires along the wall through the floor. Safely pass them under the carpet to ensure they remain safe on the floor.
Also, ensure that the colors are correctly matched.
Step 5:Test The Connection
Once all the devices are correctly connected, test that the amplifier can play music and output it through the ceiling speakers. If the speakers cannot produce sound, it is essential to troubleshoot the connection before sealing back the speakers.
Step 6:Seal And Paint
Once the ceiling speakers are appropriately wired to the amplifier, seal the spaces around them with tape. Additionally, you can paint the area to add more finishing touches for extra style. Besides, for additional glamor and blending with room décor, you paint the ceiling speakers so that they can seamlessly integrate with the wall and ceiling again.
Amplifier For Ceiling Speakers
Finding the right amplifier for ceiling speakers is quite a similar process to finding the right amp for a passive speaker. You will be looking for similar features but considering highly the impedance compatibility and power output.
Here are some of the top bets for your ceiling speakers.
1. Best Budget:Sony STR-DH790
- Compact
- 4 HDMI inputs and one HDMI ARC output
- 4k/60 Hz pass-through support
- Compatible with 6-16 ohm speakers
Prednosti
- Ugodno
- 7 speaker terminals
- FM tuner
- Bluetooth connectivity
Slabosti
- Lacks Wi-Fi
- Only 4 HDMI inputs
- No preamp outputs
2. Best Under $1000:Marantz SR5014
- 8 HDMI inputs and 2 HDMI out ports
- HDCP 2.3 compliant ports
- Additional features include Bluetooth connectivity and AM/FM tuners
Prednosti
- Comes with a calibration mic and a setup assistant
- Multiple digital/analog audio inputs
- 7 speaker terminals
- 2 subwoofer pre-outs
- Wi-Fi and Bluetooth connectivity
Slabosti
- All the ports are still HDMI 2.0
What Do You Plug Ceiling Speakers Into?
An external amplifier should power all the ceiling speakers. Standard speaker cables make the connection.
Amplifier For Ceiling Speakers
- Best Budget:Sony STR-DH790
It is versatile, clean design, and is compact. The Sony STR-DH790 is classified as 7.2 and supports Dolby Atmos and DTS:X. You can therefore use it in the 5.1.2 configuration for two ceiling speakers.
Prednosti
- Ugodno
- Fully-featured remote and mic available
- All HDMI inputs support 4K/60Hz pass-through
- Seven speaker terminals and two subwoofer pre-outs
- Minimum RMS output – 90W per channel
- Compatible with 6-16 ohm speakers.
- Bluetooth supported
Slabosti
- Lacks Wi-Fi
- Only 4 HDMI inputs
- Not compatible with 4ohm speakers
- No preamp outputs.
Other amplifiers for ceiling speakers you can choose from include:
- Marantz SR5014
- Pyle PDA6BU.5
- Rockville RCS80-1
- Pyle Model:PWA15BT