Vodnik za merjenje kablov za avtozvok s tabelami
Vodnik za merjenje kablov avtomobilskega avdio kabla z grafikoni
Ko nadgrajujete stereo sistem v avtu, je pomembno, da dobite kabel ustrezne velikosti, in čeprav je v igri veliko dejavnikov, vam bo ta vodnik za premer žice dal dovolj znanja, da boste razumeli, katero velikost izbrati.
Ne glede na to, ali gre za vaš ojačevalnik, nizkotonec, zvočnike ali druge komponente, je prava velikost žice ključnega pomena, če želite kar najbolje izkoristiti svojo novo opremo.
Napačna odločitev ne bo vplivala le na zvok vaše glasbe, ampak lahko poškoduje vašo avdio opremo, električno napeljavo vašega avtomobila, v najslabšem primeru pa lahko celo povzročite požar v vašem avtomobilu.
V tem članku si bomo ogledali glavne vrste ožičenja avtomobilskega avdio sistema in različno velikost žice, ki jo potrebujete za vsako od njih. Za vsako razlago je na voljo tabela s premerom žice, ki vam mora dati dovolj natančno predstavo o premeru, ki ga potrebujete.
Ameriški premer žice (AWG)
Večina sveta uporablja American Wire Gauge (AWG), ki je ameriška standardna mera za premer električnih vodnikov. Temelji na številu matric, prvotno potrebnih za vlečenje bakra na zahtevano velikost. Torej, manjša kot je številka, debelejši je premer žice.
AWG je bil prvič predstavljen leta 1857 kot standard za zamenjavo različnih meritev, ki so jih uporabljali različni proizvajalci. Največja velikost žice je 0000 AWG, medtem ko je najmanjša standardna velikost 40 AWG.
To se uporablja tako za polne žice kot za vijačne žice, čeprav so lahko vijačne bakrene žice nekoliko večje od polnih žic, čeprav so enakega premera. Kljub temu boste z uporabo vodnika za premer žice AWG dosegli enak rezultat.
Obstaja veliko razprav o tem, ali večje število pramenov izboljša vašo zvočno zmogljivost, vendar v resnici ne gre za več pramenov žice, ampak za to, da dobite pravi premer žice.
Poskrbite, da boste pravilno zavarovali žične povezave
Za pridobitev prave velikosti je potrebna uporaba vodila za premer žice, vendar je varna povezava žic ključnega pomena tudi pri namestitvi katere koli zvočne opreme, saj bo zagotovila dobro in trdno povezavo.
Slaba povezava se lahko hitro prekine, in če se zgodi, lahko povzroči številne težave za vaš stereo sistem in glavobol, ki ga ne potrebujete.
Obstaja veliko različnih vrst priključkov in nekateri so boljši za določeno električno napeljavo, vendar ne glede na to, kateri priključek uporabljate, poskrbite, da bo povezava trdna.
Crimp konektorji so dovolj dobri. V bistvu gre za električni konektor, ki se uporablja za zaključevanje ali povezovanje nasedlih žic. Žica bo šla v konektor in dokler jo stisnete z nekaj kleščami, boste imeli trajen, trden oprijem.
Spajkanje je še en odličen način za zavarovanje vaše električne napeljave. To je nekoliko več dela, a dokler je opravljeno pravilno, s pravilno opremo za spajkanje, je to najvarnejši način povezovanja žic in zvočne opreme.
Spajkalne žice vam bodo zagotovile najboljšo povezavo, vendar poskrbite, da boste delo opravili pravilno. Če tega še nikoli niste počeli, vam priporočam, da nabavite nekaj spojnikov za stiskanje, saj lahko slabo spajkane povezave povzročijo številne težave.
Ko povežete svoje žice, je vedno dobro, da povezave zavijete v skrčljiv ovoj. To jih bo zaščitilo pred prahom in umazanijo ter okrepilo vašo povezavo in zagotovilo, da se vaše žice ne bodo nikoli raztrgale.
Torej, zdaj imate vse informacije o standardu AWG in najboljši povezavi za vašo električno napeljavo, čas je, da si ogledate vodnik za premer žice za vsako namestitev.
Ozemljitvene povezave
Ozemljitev je potrebna za vse električne naprave, ki so nameščene v avtomobilu. Ozemljitev je negativna električna povezava, ki napaja enoto in bo večinoma povezana s šasijo avtomobila. Slaba ozemljitev je verjetno najpogostejši vzrok za težave z avtomobilskim zvokom, zato poskrbite, da boste to pravilno izvedli.
Ozemljitvene žice morajo biti varno pritrjene na čisto, nepobarvano kovino ali namenske ozemljitvene točke na ohišju. Odlično mesto za povezavo ozemljitve je pod vijakom varnostnega pasu, saj vam bo zagotovil varno povezavo s šasijo.
Ozemljitvene žice morajo biti prave velikosti, potrebne za aplikacijo. Torej, če nameščate 600 W ojačevalnik, mora biti vaš premer ozemljitvene žice sposoben napajati to.
Na splošno bo vaša ozemljitvena žica enake velikosti kot napajalni kabel, o katerem govorim tik spodaj, zato za vodilo o pravem premeru žice za ozemljitev sledite velikosti napajalnega kabla.
Priključitev ojačevalnika v vašem avtomobilu
Vaš ojačevalnik je eden od kosov zvočne opreme, če ne celo tisti, ki jemlje energijo najbolj, in večji RMS kot lahko doseže vaš ojačevalnik, večji napajalni kabel boste potrebovali.
Če napeljete premajhen napajalni kabel, se lahko vaš ojačevalnik hitro poškoduje, zato poskrbite, da boste to pravilno izvedli.
To work out the wire gauge needed for your power cable you need an idea of how much current your amp will try to consume, and on how long the wiring run from battery to amplifier will be.
To work out the approximate amperes of your amplifier, you need to multiply the number of channels by the RMS per channel. If you have more than one amp, you need to add them all together, and divide that by the efficiency and then the voltage.
There are two common types of amplifiers:D Class and A/B Class. You never get 100% efficiency out your amp, so it throws another spanner in the works. Generally, Class D amps are more efficient and you should get around 75% efficiency, whereas with an A/B amp you will get around 50% efficiency.
So, to work it out:If you have a Class D amplifier, you need the total RMS divided by 0.75 Amp Efficiency divided by 13.8 Volts to get your Current Draw in Amperes.
So, if you have a 600W RMS Class D amp, your math will be 600/0.75/13.8 =57.9710145, which rounded up is 58 amperes.
As you can see in the wire gauge chart below, the gauge needed for an 8 foot power cable would be 8 gauge.
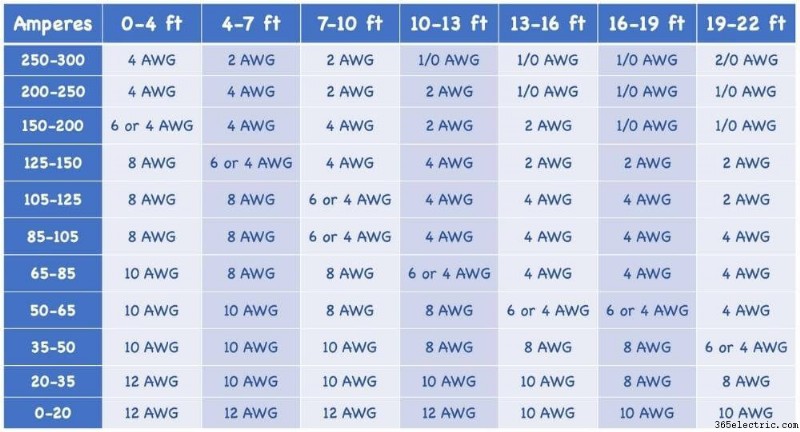
If you have an A/B Class, you need the total RMS divided by 0.50 Amp Efficiency divided by 13.8 Volts to get your Current Draw in Amperes.
So, if you have a 600W amp, your math will be:600/0.5/13.8 =86.956521, which I’d round up to 87 amperes.
As you can see in the wire gauge guide above, the AWG I’d need for a power cable of the same length would be either 6- or 4 gauge wire. I would always round down and go for the bigger wire so I’d get a 4 gauge power cable. Quite a difference from the D Class amp above!
Other Wires Running From Amplifier to Receiver
You can get amp wiring kits with all the wires and connectors in, which are a good idea as you can keep hold of them in case you need to replace any wires further down the line.
All amplifiers will come with a Remote Turn-on Wire, but if you have to replace it, you should get an 18 AWG blue wire.
For the RCA Jacks, you will just need to replace them with some standard RCA male-to-male jacks. These usually come between 22 gauge to 18 gauge, and the more powerful your amplifier is, the better it is to go with the bigger 18 gauge
Speaker Wires
Running speaker wires, whether it’s directly from your head unit or from your amplifier, allows your speakers to receive the audio signal, so they can reproduce those amazing sounds we all love to drive along to.
Speaker wires are typically 2 separate stranded wires molded together, with one strand being the positive + and the other strand being the negative – strand.
There are many different qualities of speaker wire, so it’s a necessity that you get the best you can afford, because cheaping out on speaker wires, will cause you problems and you won’t get the best out of your audio equipment.
Some cheaper wires that claim to be a certain gauge might not be, and instead you’ll be buying more plastic sleeve than wire.
Depending on the speakers you have will determine the wire gauge you need, and below in the wire gauge chart you can work out what is best for you.
Factory speakers will run on pretty much any size wire, as the power demands are minimal. But of course, most people into audio upgrade their car speakers, so getting the right size wire is necessary for you speakers and subwoofers.
Aftermarket speakers need more power, so the electrical wiring that drives the signal to them needs to be bigger than factory speakers.
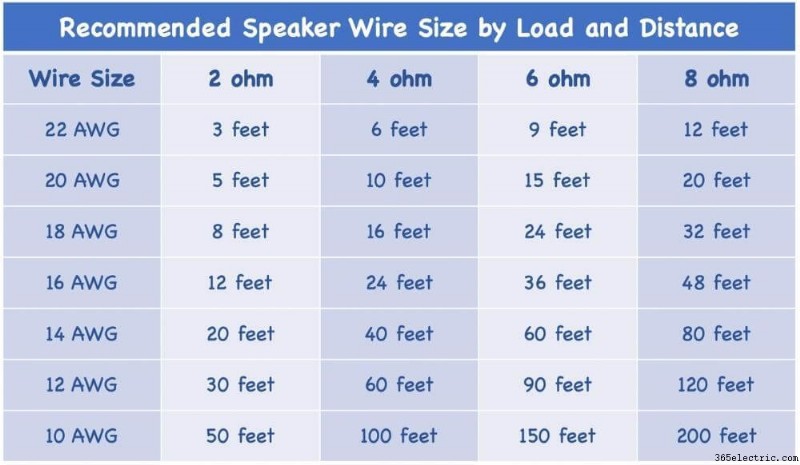
Speaker wires are usually between 18-14 gauge, but to work out the size for yours, you should know the Impedance and distance.
Looking at the chart above:If you are running speakers at 4 ohms and the distance needed is 20 feet, then you are between 18 and 16 AWG. In this case I would always go for the bigger wire, so go for 16 gauge.
For subwoofers the speaker wire will tend to be a bit bigger. Usually you will need as big as 14-12 AWG, but the calculations are the same as the speaker wires on the wire gauge chart above.
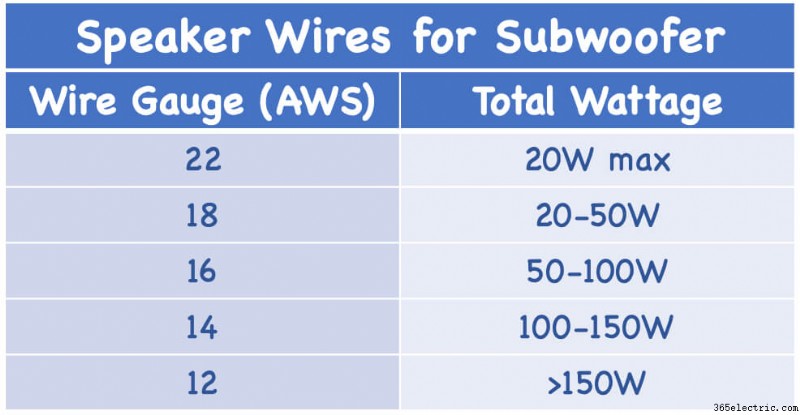
Although another general rule of thumb is to work out its total wattage, and looking at the wire gauge chart here with RMS wattage, you can just go for that size wire.
You can use both wire gauge guides to come up with the wire size you need, but generally speaking you should need something between 16- and 12 gauge speaker wire for your subwoofer. And always go for the bigger wire if you’re getting mixed results.
Crossover Wiring
Using a crossover gives you more control over your sound system, but many people get confused with the electrical wiring.
Crossovers need 12v of power, which many people think it needs a thicker gauge wire, but because crossover demands less current, as a general guide 18 gauge wire is usually fine.
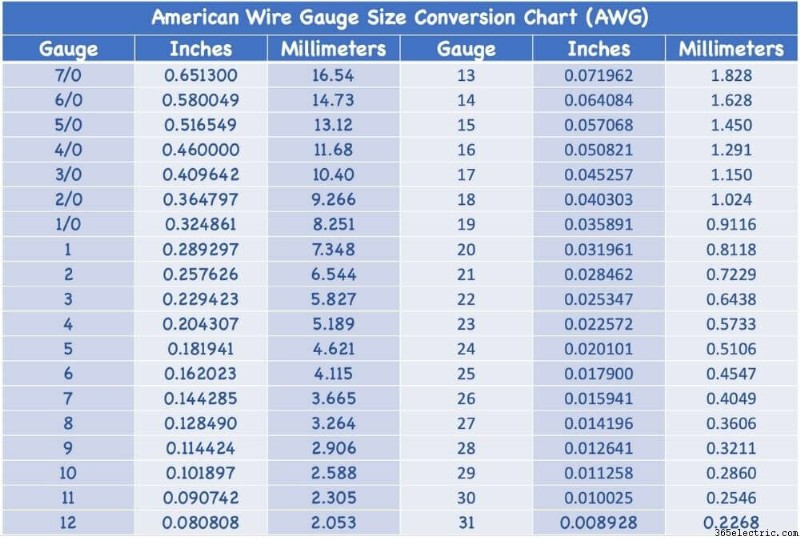
Wire Conversion Chart
All measurements in the wire gauge charts above are imperial, but for anyone who works in metric (most of the world), please find the wire gauge chart below for converting inches to millimeters useful.
Other FAQs About Electrical Wiring Gauge
Why do you need different gauge for different wire lengths?
Basically, resistance increases the longer electrical current has to travel. This is because as it’s travelling the electrical resistance builds up, so the longer it is, the more resistance. And the electrical current can only travel so far before there’s a voltage drop, which is why you need a bigger power cable.
What happens if I go too small?
If you get too small a size wire, it depends, but it’s not good. You might be lucky and just temporarily lessen the quality of of your soundstage, or you could damage your equipment and even set your car on fire.
The problem is determined by the wrong wires you install. That’s why it’s always necessary to know the correct size you need by looking at wire gauge guides.
What happens if If I go too big?
If you go too big, don’t worry too much as it won’t damage anything. But of course if you go too big it will cost you unnecessary outlay as the bigger wires are more expensive.
Also, the bigger the wire, the more room it will take up and the harder it is to bend. So, try and get it right, but too big is definitely better than too small.
What happens if my wires are too long?
When you buy the wires, it’s always a good idea to buy more than enough. However, when you install your audio equipment, don’t leave too much wire hanging out or even rolled behind something, even if it’s hidden.
Cut the wire at the appropriate length, because longer wires add unnecessary resistance and can create impedance. It also leaves your car looking messy.
Choosing The Right Size Wire for The Right Audio Equipment
So there you have it, a wire gauge guide for all the important electrical wiring in your car stereo system.
All the different wire sizes can be confusing, but looking at the charts or even a wire gauge calculator will give you a better understanding of which size to get.
All wiring is important, but pay particular attention to your power leads and do the math correctly for the total amperage and distance, because this is where you could get most problems.
Always ensure you buy good quality wiring, because you don’t want more sleeve than wire. There are some great amp wiring kits out there with all wires needed, so if you need the full bundle one of these is a good way to go.
Last but not least, always make sure you connect all wires with a good solid connection. Whether it’s crimp connectors or soldered connections, it’s up to you, but whichever way, make sure you test the connection with a few good tugs as you wire everything up.
If you have any questions and need more wire gauge guidance, leave a message in the chatbox below and we will get back to you.